Tuesday, 27 March 2018

Tray

Aluminium Tray

March 28th, 2018


Aim: To create an Aluminium Tray using techniques shown to us in class

Objectives: 
  1. Smooth even finish
  2. Minimal Burs and an even smooth edge
  3. Must create an tray identical to designated group member
  4. Mustn't have gaps in between the to trays when aligned and the base must be flat not rounded
  5. Stand out from the rest


 Process:


The first thing in creating the aluminium tray was to create a mould in which the tray will be formed on.Using a CNC machine a template which was already created in the system was cut out of a thin piece of PLY to provide the final shape of the tray.Using this template the design was traced onto pre-cut plywood and cut out and shaped using a disc sander.Once i achieved the correct curves i then traced the mould onto the piece of aluminium, leaving ample room to achieve a 10mm height on the tray


Once i had traced the mould I then cut out the trays shape using aviation snips.Then using the two moulds i sandwiched the aluminium between the them ensuring they are even on both sides and then placed it into the vice clamp.Using a plastic mallet I began to slowly and carefully form the aluminium to suit the mould of the tray.This process followed around the whole tray until i achieved the required tray look i needed.
The hammering process was very challenging due to the fact that each hit was required to be pin pointed and not hit to hard otherwise it would have ruined the shape.Hence, in order to achieve a greater look it took me longer then expected.


Then after I was happy with the shape of the tray i began to smooth out the edges, curves and base of the tray to provide a nice smooth and neat finish.After sanding, planishing and hours of tedious work i finally finished and produce the below tray masterpiece.


Our tray didn't match 100% probably only 95 % but it was pretty good for our first time considering we had never done that kind of stuff before


Tuesday, 20 March 2018

Torus


Aluminium Torus

March 20th, 2018


Aim: To create an Aluminium Torus using techniques shown to us in class

Objectives: 
  1. Smooth even finish
  2. Minimal Burs and an even smooth edge
  3. Consistent Curve going both ways
  4. Even curve throughout the Torus
  5. Stand out from the rest


 Process:


Firstly, using the shrinking machine I crimped the two sides of the rectangular piece of aluminium to provide a gentle curve throughout the whole piece.By doing this I also was able-to divide the Aluminium into 3 pieces to make it easier to mould.


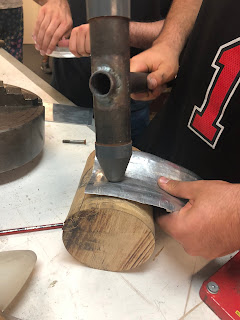
Then once the edges were crimped, using a log with a depression in it and a steel wth a plastic head mallet i began to carefully mould the aluminium to provide two directional curves into the piece.This process was challenging as you required someone  to hold the piece of aluminium steady whilst i hit it, however it was easier said then done.As a result of it's complicating process I didn't achieve an even consistency on both sides meaning I had to keep on doing it again and again until it was right.


After I had achieved the desired look of the Torus I then utilised a planishing hammer and dolly  to round the edges to provide a wavy cross section through the piece.This process provided greater depth to the aluminium and emphasised the look of the torus.I was also able to provide a hammer-tone finish to the whole piece making it look rustic.


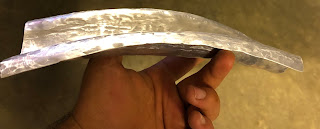
After a long and time consuming effort the final product was produced as seen above.The one and only reversed torus


Tuesday, 13 March 2018

Aluminium Bowl Making


Aluminium Bowl

March 14, 2018


Aim: To create and Aluminium bowl using techniques shown to us in class

Objectives: 
  1. Smooth even finish
  2. Minimal Burs and a even smooth edge
  3. Suit radius Gauge Given by Russell
  4. Stand out from the rest


 Process:


         Concentric circles were cut out using the Laser printer, which provided the radiuses for the bowl and guidelines to which the bowl will be formed to.


 The Concentric circles were then marked out on square piece of aluminium, which was used to mould the curvature of the bowl.The circular perimeter of the Aluminium sheet was cut using tin snips and using a file I removed the excess burs on the edges


Using a fibreglass mallet and depressed Timber stump, I was able to achieve the required curves for the bowl through utilising  a hammering technique which concentrated on the shaping the concentric circles marked out originally.For greater detailing a sand bag was used to provide a nicer and more detail curve to the bowl.


Using the english wheel I was then able to get rid of the lumps and divots in the aluminium which formed due to hammering out the material to round it up.The wheel provided a nice smooth and rounded surface for the bowl.


Using a planishing hammer and steel ball, I went through and planished the whole bowl to provide a nice hammer-tone finish to the aluminium.I could have left it with the original standard english wheel finish however I wanted to go a step further and provide a nicer rustic industrial look to the bowl.


.


After continuous hammering, annealing and smoothening I was-able to achieve the desired R125 radius I wanted for the whole bowl. ( Images above )


Once the bowl was suited to the required standard wanted, I sanded the edges and used steel wool to lift the colour of the aluminium providing my final masterpiece.( Above)