April 4th, 2018
Aim: To create an Aluminium Blister using techniques shown to us in class
Objectives:
- Smooth even finish
- Evenly rounded blister which is clearly defined in the aluminium
- Blister free from cracks and dents
- Stand out from the rest
Process:
Firstly, in order to create the shape of the blister the first thing that was required to be done was create a mould in which the blister will be formed.Using a CNC machine which had a pre-made impregnated design the machine cut out two identical raindrop looking shapes into a piece of 15mm MDF.Once they were cut I was then required to remove excess material using a router as well as some sandpaper to achieve identical shapes when joining the two pieces of MDF together.
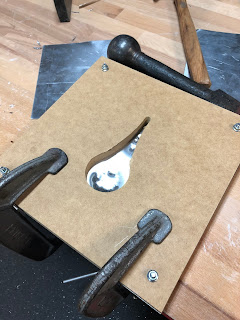
Secondly, once my moulds were completed I was then required to cut the piece of aluminium using a guillotine, to be used to in conjunction with the MDF to from the blister.Once cut I marked the centre of the sheet and sandwiched the sheet between the two pieces of MDF ensuring the centre I had marked out lined up with the centre of the mould.I then used 4 bolts and bolted the two pieces together through the pre- drilled holes from the CNC cutout.After I had ensured they were tightened up I then used 2 G clamps and clamped the mould onto two pieces of 16mm ply on the bench which were used to elevate the mould to provide the blister depth required.
Thirdly, utilising a fibreglass/plastic mallet I began to slowly tap the inside of the mould to begin depressing the aluminium into the rounded blister shape.This process was very frustrating and delicate as tapping too hard will cause large dents in the aluminium as well as potentially causing it to tear.Hence, in order to achieve a nice and professional finish I was required to softly and delicately tap the aluminium in a repetitive process to I achieved the required depression of the material I needed.
Due to the extent of the shape and the fine detail of the blister the mallet was unable to be used to provide greater depth into the blister, especially in the narrow parts as the mallets head was to big for the gap.Hence in order to achieve this detail for these areas, I was required to form a jig using a piece of timber and a drum sander to allow me to mould the aluminium edges to a perfect blister.This was very complicated as the timber couldn't be too flat otherwise it would've caused dents hence the reason why I had to round the edges perfectly to achieve an even curve throughout the whole blister. Using the jig and a mallet i was able to gain greater definition on the edges with more defined curves and depth, which ultimately provided a flatter and more even depression to the mould.
After hours of hammering and moulding I then removed the aluminium from the MDF mould.Using a guillotine I cut the aluminium to equal size TO allow the blister to stand out more.After that i gave it a sand & buff with some steel wool and the final product as seen above was complete :)


No comments:
Post a Comment